... that I have time of college? After weeks of writing one test after another I finally have time to lounge around my parents house, cook, sew and write blog posts :) Today is all about my personal colour palette. And how to find yours if you're hard to fit into the classical four colour seasons or the 12 or even 16 flow colour seasons.
Showing posts with label tutorial. Show all posts
Showing posts with label tutorial. Show all posts
Wednesday, 6 June 2012
Wednesday, 26 October 2011
Not so Spirally Spiral Skirt -Drafting Part 2
This is the best resemblance of me I could find. I was down the past few days, I still don't want to eat anything. I have moved from PJs to extremely soft jeans though. Enough whining from me and on with the tutorial!

Last time we got as far as drafting the position of the break. Today we'll shift the dart control so you don't end up with a bag that shows your undies for a skirt :P!

- On your break line draw in the points directly underneath your dart apexes.
- Then draw a straight line from apexes to hem. This line should go through the dart apex and the point of the right-side neighbour on the break line (If you want the skirt to spiral in the opposite direction you can just flip the entire pattern around at the end.).


- Shift the darts as shown in the diagrams.


I couldn't find an elegant way to pivot the shaped darts and keep the seam straight. I'm sure there is a method though. I just have to find it. For this it doesn't matter all that much. The skirt is cut on the bias. Well the non-true one anyway. I'll explain about that next time.
Butterfly
Monday, 24 October 2011
Straight Seamed Spiral Skirt - Drafting Part 1
 |
| Illustration of a possible skirt outcome The area where the break is is shown in blue. The red part shows the amount of turn. |
Materials:
- basic skirt sloper (pattern of a well-fitting pencil skirt)
- pattern paper (you can use newspaper, butcher paper, paper table cloths, normal paper taped together ...)
- long ruler or other straight edge
- measuring tape
- French curve or a flexible ruler or a piece of washing line
- Trace front and back parts of your sloper (or of your skirt without the seam allowances).aligning the side seams. As this is an asymmetric design you'll need to trace both halves. You'll have shaped darts at the side seams and a "normal" dart in each of the pieces.
- Measure the distance from CFW (centre front front at waist) to how long you want your skirt to be. Shorten or lengthen the centre seam accordingly. Shorten or lengthen al the other seams by the same amount and draw in the new hemline.
- Measure the hip measurement (play at connecting the dots with the apexes of the darts) and divide this measurement by six. Dolly's hip measurement is precisely 14 cm. This gives me a result of 2.3333 cm. I will round this measurement up to 2.35 cm. Please remember that you should never round your measurements down.
- Start shifting the darts and side seams by folding the pattern in one place and adding the same amount somewhere else. This works because you don't have any sharp angles in your body so you can shift the darts a little bit.
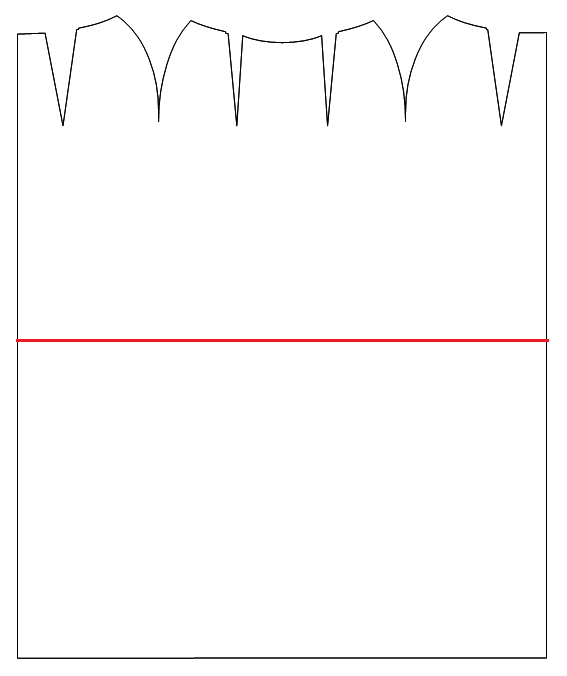
- Decide on where the break should be by measuring down from your waist. Draw this line on your pattern paper. It should be the same distance from all the darts. NOTE: The break line can only be as far away from the hem as half the distance from hem to dart apexes.
 |
| This is roughly what the skirt sloper for Dolly looks like. As it is only knee length I lengthened it to just above the ankles. |
 |
| The red lines show where I will add length and the green lines show where I will take some away. |
 |
| I choose to have the break in the middle. |
So much for today. I'll have the rest for you within two days.
Butterfly
Sunday, 23 October 2011
About the importance of reading your comments before you publish them ....
So I admit it: I am stupid ... and lazy! I am following a sew along. It's very graciously hosted by Anna at A Few Threads Loose. There had been a longish gap and I wanted to ask when it would continue. So I wrote a comment in no ill intend and sent it without reading it first. Right now I could actually slap myself for that. My comment was this
"I know you're very busy with affordable manicures and such, but when does the sew along continue?"
Argh! I'm not the most horrible person in the world. I simply forgot the god-damned smiley. If I where Anna I wouldn't even have kept posting. She had mentioned that she really wanted to get a manicure on her trip (and who wouldn't). So I figured I might be able to start making up for it by taking some work of her hands. Do you think it's any good?
Okay so I know I'm not going to be able to write a sewalong as well as she does. Instead I'm going to write about something that she luckily doesn't have to worry about: LBAs. Anna's method just added inches horizontally. Like the Facebook user I didn't get enough coverage. I was actually afraid things would pop out. Now the Facebook person was much smarter than me: She just scaled the pattern up! So here's a tutorial about how to do that.
First you have to find the bust point For this I connected the lower edge of the upper dart and the lower edge of the middle dart along the bottom. And I drew a line that halves the angle on the CF corner. The intersection is where the BP is.
Then you measure the distance from BP to the lower edge along the red line. I came out with 8.75 cm. Anyone have something different? Then measure the distance from your BP (the nipple) to your under bust (where the under wire would lie). From that you can calculate the percentage you need to scale up or down by.
SCALE="BP to UB on you" *100
"BP-UB on the pattern"
You then just print your PDF-Pattern that much bigger. Be careful about the notches as they will be in a different place now. Measure along the lower edge of the bra cup (darts folded) to determine the distance from CF to notch and mark the new distance on the braa band.
I haven't made a full bra like this yet, but I have cut a muslin and basted everything together and that fit just perfectly.
You can of course use this method to make any bra cup fit you. Just find the bust point, measure and scale. This also works for making a bra cup smaller.
"I know you're very busy with affordable manicures and such, but when does the sew along continue?"
Argh! I'm not the most horrible person in the world. I simply forgot the god-damned smiley. If I where Anna I wouldn't even have kept posting. She had mentioned that she really wanted to get a manicure on her trip (and who wouldn't). So I figured I might be able to start making up for it by taking some work of her hands. Do you think it's any good?
Okay so I know I'm not going to be able to write a sewalong as well as she does. Instead I'm going to write about something that she luckily doesn't have to worry about: LBAs. Anna's method just added inches horizontally. Like the Facebook user I didn't get enough coverage. I was actually afraid things would pop out. Now the Facebook person was much smarter than me: She just scaled the pattern up! So here's a tutorial about how to do that.
 |
| Draft of the bra cup pattern. The red lines are those used to find the BP (bust point). |
Then you measure the distance from BP to the lower edge along the red line. I came out with 8.75 cm. Anyone have something different? Then measure the distance from your BP (the nipple) to your under bust (where the under wire would lie). From that you can calculate the percentage you need to scale up or down by.
SCALE="BP to UB on you" *100
"BP-UB on the pattern"
You then just print your PDF-Pattern that much bigger. Be careful about the notches as they will be in a different place now. Measure along the lower edge of the bra cup (darts folded) to determine the distance from CF to notch and mark the new distance on the braa band.
I haven't made a full bra like this yet, but I have cut a muslin and basted everything together and that fit just perfectly.
You can of course use this method to make any bra cup fit you. Just find the bust point, measure and scale. This also works for making a bra cup smaller.
Subscribe to:
Posts (Atom)